Friday, April 12, 2019

My Current Top 5 Beauty Products

**Get 15% off the Beautycounter products for a limited time!!**

My beauty routine sure has changed a lot over my lifetime. I was a die hard acne face wash person in my teens (even though, oddly enough, I didn't get acne until early adulthood), then I moved to Cetaphil since I thought it was cleaner, I even tried some of those infomercial face routines to help with my skin and, guess what? They'd work just long enough and then I'd go back to cystic acne, oil blotting sheets... you name it.

Almost 6 (!!) years ago I wrote this blog post on how I started out with healthier beauty products. I had been Paleo for some time, and saw improvement in my skin, but still didn't make much thought about what went on it.

Fast forward to now and I rarely break out.. and to be honest, I rarely wash my face (since I rarely wear make up!). My eating isn't 100% Paleo but by carefully choosing my products I have managed to maintain good skin for being 41 years old.

In fact, here is my "I woke up like this" face.. nothing on it except for a few skincare products from the night before that I am going to share about, right now.

Here are my current top 5 products for my face - and I am sure they will be ever changing. Make sure to keep up with me by subscribing to my emails and following me on instagram @flametofork!

Beautycounter products are 15% off right now and that RARELY happens.. if you want, skip my wordiness and just jump to the sale! 

Top 5 Beauty Products (in no particular order)

1. Fatco Myrrhaculous Face Cream - This has been my main face moisturizer for many years now. Yes, it is made with tallow, but somehow smearing fat all over my face has helped to balance out the oiliness I use to sop up with oil blotting sheets.

2. Primally Pure Charcoal Deodorant - Or really, any of their deodorants. I love that it's stick form like the toxic alternatives, but is squeaky clean.

3. Beautycounter Charcoal Cleansing Bar - This was one of the first products I tried out with Beautycounter and I was a bit hesitant. I hadn't used a bar of soap on my face in years and since I was aware of stripping oils from my face could cause oil problems, I worried this would do the same. It doesn't! I use it in the shower in the morning with my Clarisonic and it never feels overly tight once my skin is dried.

4. Beautycounter No. 1 Brightening Face Oil - A newer addition to my routine, my first reaction was "it smells so good!" I am super sensitive to smells and my nose can sniff out the tiniest amounts of artificial fragrances. But nope, it smells like fresh squeezed oranges and instantly made my skin feel so soft.

5. Charcoal Facial Mask (ie. No. 3 Balancing Facial Mask) - A little charcoal to pull out impurities, a little salicylic acid to gently exfoliate. I do this every 1-2 weeks to pull out all the junk that gets missed on a daily
basis.

This list isn't exhaustive and it's not your only options for clean beauty, so shoot me an email if you have questions, want options you can purchase in your local stores, etc. The reason I have chosen to partner with companies like Beautycounter and to recommend others is because of not just their products, but their mission. I want to know that it's not just about the bottom line, but also about spearheading a movement to remove toxins in our daily lives. If you care what you put into your body, you need to care what you put on it too!


Thursday, April 30, 2015

Coconut Crusted Tuna Cakes w/Mango-Jalapeno Aioli

Can we just tell you how much we're loving the increasing availability of amazing products that are GOOD for us? There is the over-abundance of grain-free treats popping up all over the place - much to many 21DSD'ers or Whole 30'ers dismay, but there is also the jam-packed with nutrition stuff that went into this recipe.

First up is Safe Catch Foods' tuna - be on the lookout to see this show up in stores everywhere - especially your local Sprouts! What is so special about this tuna? It's the only brand that tests every single tuna for mercury levels: this tuna meets Consumer Reports “Low Mercury” criteria for pregnant moms and children, which is the strictest mercury limits! Yay for getting Omega-3's during pregnancy! They also pack raw and cook in BPA-free cans to ensure the tuna isn't over-cooked and to seal in nutrients.

Next is Primal Kitchen Mayo! While Tonja prefers to make her own, Clare prefers to just buy hers. But we both agree that this is the best mayo you can buy anywhere. The taste is clean and the ingredients are good for you. No canola oil, no questionable egg substitutes, just pure avocado oil, cage-free & organic eggs and NO SUGAR. Why sugar ever got into mayo, we have no idea.

With these two products in hand, we were determined to come up with a tasty recipe … and thank goodness we got it right the first time. Wasted mayo and tuna is no laughing matter. And for those skeptical of "fishy" tuna (Tonja here - canned tuna was an acquired taste for me!), this recipe might just be your gateway into liking canned tuna.

If you're a tuna newbie or have never liked it before, give it a go with these products and let us know! We're most active on Instagram so be sure to tag us if you make any of our recipes!


Coconut-crusted Tuna Cakes w/Mango-Jalapeno Aioli

grain-free * gluten-free * dairy-free * Whole 30

Makes 6 tuna cakes

For the tuna cakes:
  • 2 (5 oz.) cans of Safe Catch tuna, drained and shredded
  • 1/4 cup red onion, finely diced
  • 1/4 cup Pork Dust (may exchange for almond flour)
  • 3/4 cup finely shredded coconut, divided
  • 2 teaspoons lemon juice
  • 1 egg, whisked
  • 1/4 cup Primal Kitchens Mayo
  • 1/4 teaspoon garlic granules
  • salt and pepper to taste
For the Mango-Jalapeno aioli:
  • 1/2 cup Primal Kitchens Mayo
  • 1 cup diced fresh mango
  • 1/4-1/2 jalapeƱo, depending on the level of heat you want
  • salt to taste
Start with assembling the tuna cakes by dumping all the ingredients (reserve 1/2 cup of the shredded coconut for later use) in a medium bowl and mixing until well combined. Separate into 6 equal portions and form into cakes. Put into the refrigerator for at least 1/2 an hour, but feel free to prep these the night before and refrigerate all night. 

For the aioli, we used our immersion blender (one of our favorite kitchen tools!) and put all the ingredients into a tall jar and mixed on low until well blended. Feel free to try a mini food processor or blender. 

Once the tuna cakes have chilled, remove them from the refrigerator and put the remaining 1/2 cup of shredded coconut into a bowl. Preheat a large skillet over medium-high heat with your favorite cooking oil (we used avocado oil, but you may also try an animal fat or coconut oil). Once the oil is hot, push each side of the tuna cake into the shredded coconut and put into the pan. Cook for 3-5 minutes per side, or until they are a medium to dark golden brown. 

Serve with the aioli and enjoy! 

Some of the links in the post above are “affiliate links.” This means if you click on the link and purchase the item, I will receive an affiliate commission. Regardless, I only recommend products or services I use personally and believe will add value to my readers. This money helps me continue to be able to offer support and services to you, my readers. Plus, it helps us keep my freezer fully stocked with bacon :) We all need bacon. 

Tuesday, February 24, 2015

Primal Pastures Chicken Processing Workshop - 1st Time Experience! -

Hi guys!  Its Clare :) This month I got to experience the Primal Pastures Chicken processing workshop.  My boyfriend and I made the short drive out to Temecula, CA from Orange County, CA and joined a group of about 15-20 people looking to learn more about where their food comes from.  You pay $65 for the experience and you get to take home the chicken that you process.  The whole thing took about 2 hours total.

Great turn out for this Primal Pastures Chicken Processing Workshop!
PREFACE: 
Conventional Chicken "Farm". So sad!
Before you read any further I have to warn you, this post is NOT for everybody.  I believe that there is something really amazing that happens when you physically see the process that it takes to put meat on your table, in the right way.  But there is an unavoidable fact that has to happen before that beautiful chicken is ready to pop into your oven........ that chicken has to die.  In order for the animal to die in the most humane way, it takes attention, care and respect.

Now for those of you who do not like this fact, I suggest you take a look at where your food comes from and your food is processed. The problem with factory farms is that they don't produce healthy or safe food and the animals suffer from birth until death.  I got a lot of negative feedback from some of my Instagram photos that I posted on the Chicken Processing day, but I also got a lot of positive feedback about people wanting to learn more.

I want to preface with this: I love animals and all aspects of life, but I also love to eat meat.  I try my hardest to only eat meat that I know was processed in a humane and sustainable way. I suggest that if you eat meat, you do the same.

Conventional Chicken "farm". No Sunshine for these guys :(
If this post seems too gruesome for you, thats ok!  You do not have to read it, and I totally understand :) It wasn't too long ago that I couldn't even eat chicken that was still on the bone!!  As a kid, I had my mom cut the meat off the bone before I could even stomach to eat it.  But the more I learned about my food, the more interested I became in the process.

I am a firm believer that we are better off as humans when we consume animal products, but although I know that death is necessary in order to feed us, I also know that animals should be treated with respect and dignity in every step of their life. I do find the killing part of the process disturbing no matter how it happens, but there is a better way than the factory conventional chicken "farms" we see in these photos.

If you are interested feeling connected with your food and learning about the hard work and process it takes to put those chicken tenders on your plate, read on! And if you REALLY want to get the full experience, check out one of Primal Pastures Chicken Processing workshops in the future!


About Primal Pastures:

A warm summer day at Primal Pastures - I took this photo last summer

Last summer meeting the chicks!
Primal Pastures is on a mission to bring the best quality food to your table, using the most humane, responsible and sustainable methods available.  Upon arriving to the workshop we were given a short tour of the areas that they keep the chickens and we were given a glimpse into the pastured life that these chickens get to live.  They get to soak up Southern California Vitamin D, enjoy roaming around the land, eating grass, bugs and organic supplemental feed free of GMO or soy.

I have been to Primal Pastures before and even got to hold some of the baby chicks. Very possibly these chicks could be the ones we are processing today!


The Process
Jeff explaining the metal cone
The farmers walked us through the entire processing of the chicken.  Each step along the way they explained why they were doing things the way they were.  They stressed that they were in search of a way to make the chickens life and every step along the way as humane as possible, while still delivering the highest quality meats.

Surprisingly there was very
little blood
The first step is kill the chicken. The farmers explained to us that the chickens are most calm and comfortable when they are upside down.  They feel as if they are in a predators mouth and therefore play "possum" and hardly move at all.  This makes it very easy to make a clean cut with a VERY sharp knife without cutting the windpipe.  This way, you are able to hit the carotid artery on the first try, causing the bird to bleed out quickly (within seconds) and with very little pain.

This was ABSOLUTELY the most difficult part for me to watch.  I would be lying to you if I told you my stomach didn't turn a little bit. I panicked thinking about my turn that was going to come way too soon... "I can't do this!" I kept thinking.....


Rob dunking the bird in the
hot soapy water. The feathers
come off so easily after the
hot bath.

But I kept reminding myself that this is one of the realities of eating meat.  I do not take joy in the killing process, but I know that these birds lived the best possible life and that will translate to excellent quality meat on the dinner table! I also was very thankful to have the killing process explained to me and felt the respect that the farmers had for these animals.


Rob removing the feathers
After a couple minutes, the birds were removed from the cones and they were placed in the hot soapy water.  This loosens the feathers so that they come off easily. 

The next step was really cool.  The chickens were placed in this metal drum with rubber nubs inside it.  When they flipped the "on" switch, the bird moved around in a circular motion and the feathers came off seamlessly! I posted a short video about this on our Instagram and so many people were amazed at this part of the process!


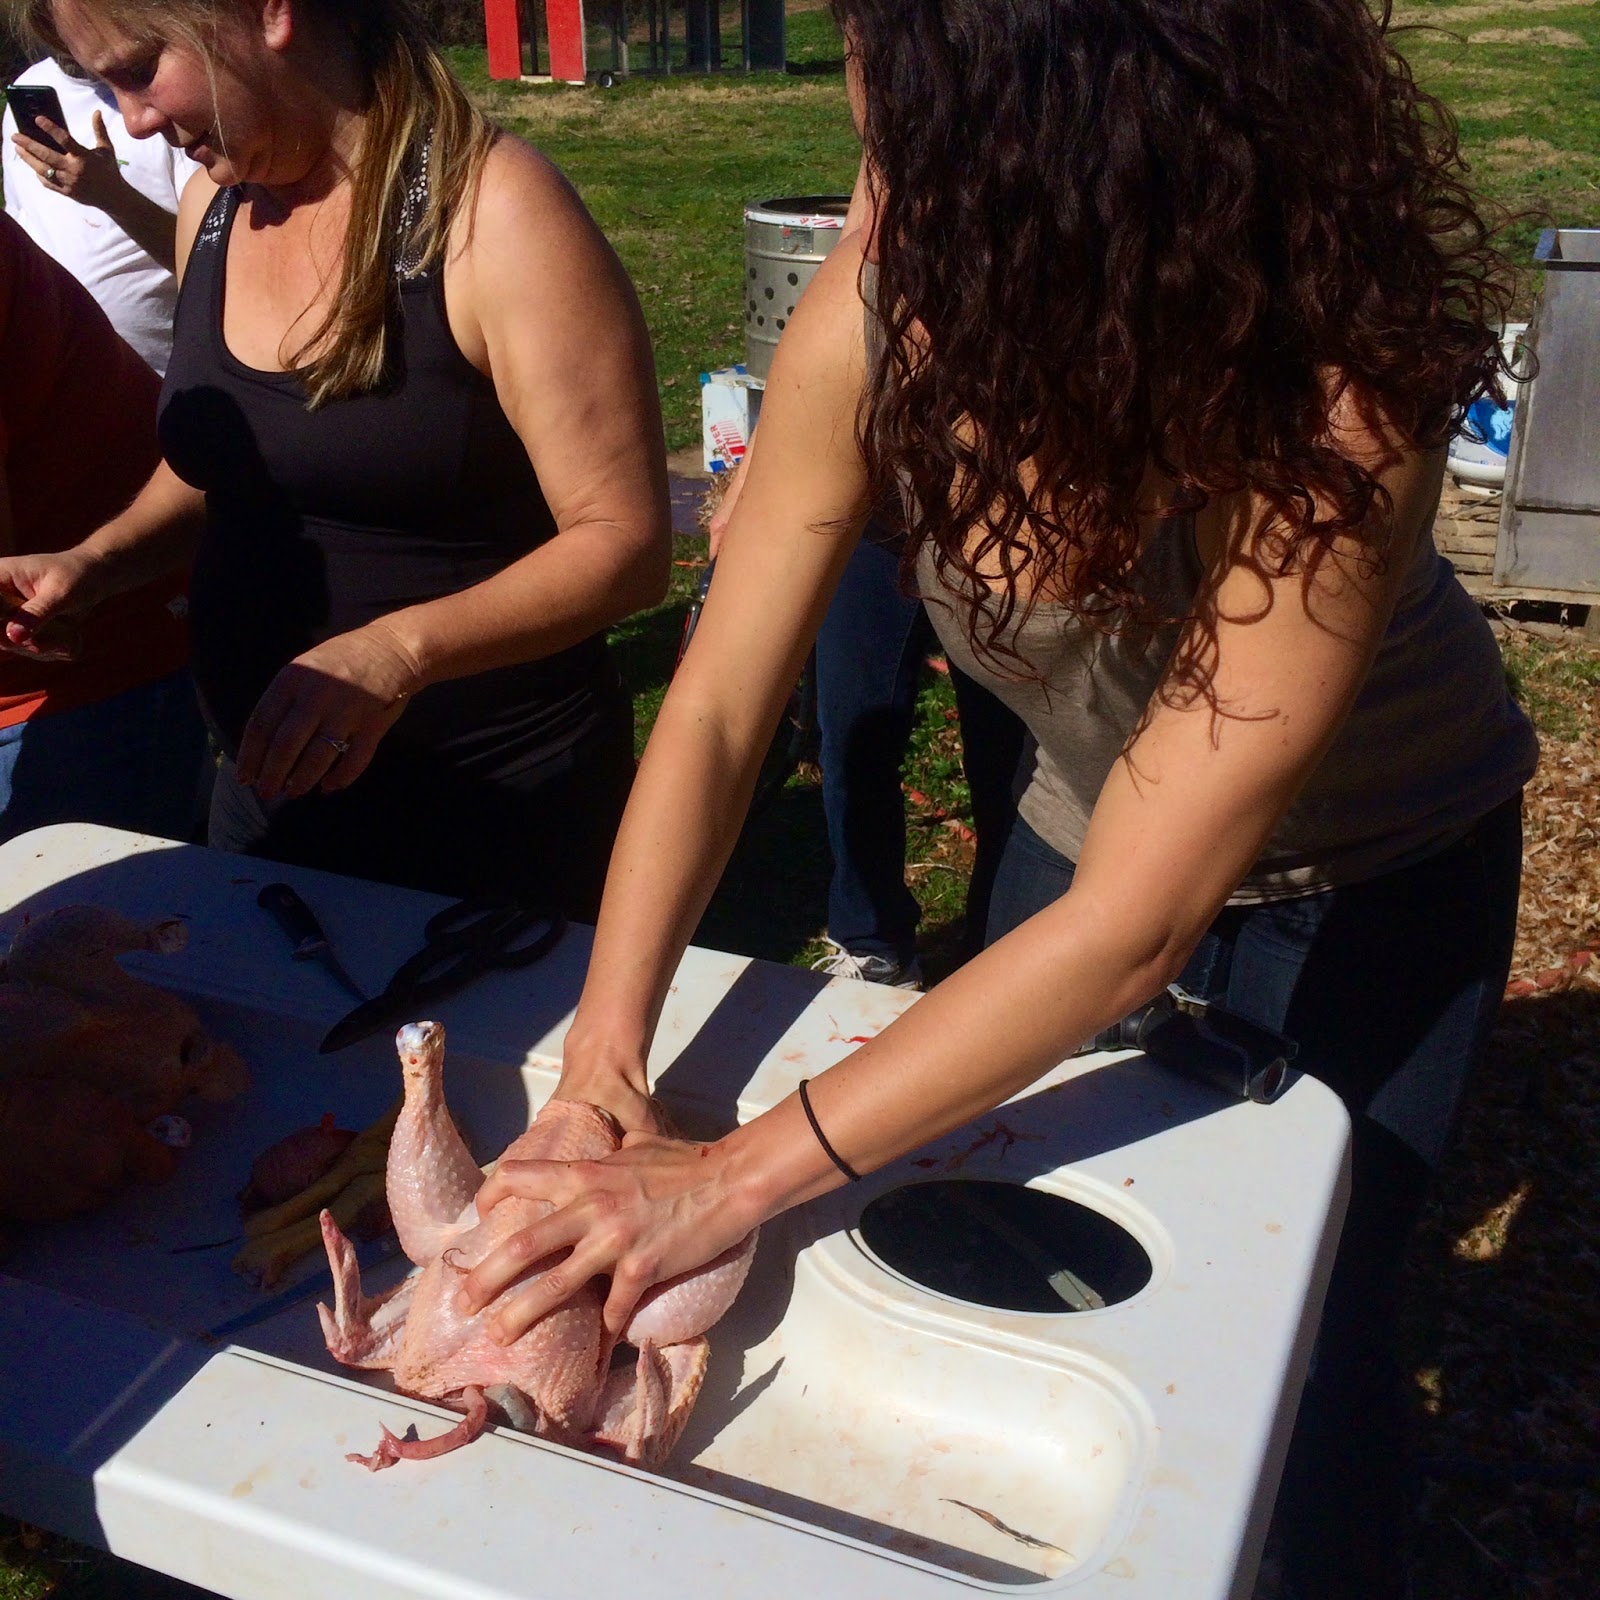
Rob removing the heads/feet
Next, the chicken was ready to take apart.  Farmer Rob explained how to basically dissect the entire chicken.  Starting with the head, feet and the insides.  This part reminded me a little of 9th grade science class when we dissected a frog and I passed out.  I knew this was going to be a tricky step when it came to be my turn....

Freezing ACV bath
After the chicken was completely done it was soaked in freezing Apple Cider Vinegar for 5-10 minutes, then in ice water for the same amount of time.  Finally, the chickens were removed, bagged and ready to be used!  I was impressed!  The total process was really quick!  But I was also nervous because I knew that it was my turn next.....


My Turn:
Now it was my turn!  I was so scared.  I have never even picked up a live full-grown chicken before, let alone one that I was going to have to look in the eye knowing full-well he would be on my dinner table that night. I mustered up the courage and grabbed the first bird I could get my hands on.  I grabbed him by his feet on my first attempt and surprisingly, he put up little fight.  He just hung there peacefully! I just wanted to get him to his cone as fast as possible, and try not to make eye contact. :
My first time grabbing a chicken by its feet! He hardly moved at all!
My heart was pounding leading up to this next moment. I placed my chicken into the cone and stepped back.  Now don't make fun of me, but I said a little prayer for this little chickie. I didn't make a scene or say anything out loud, but I quietly took a moment to give thanks and to ask for strength. I just wanted to make sure that I was as thankful as possible for the sacrifice this bird was going to make in order to feed me. And I also wanted strength to be able to complete this task effectively and efficiently on the first try.  I wanted to make sure I did it right and was super focused. I know what I am about to say sounds like an oxymoron... but I wanted to do it correctly so I didn't hurt the bird in the process. 
I couldn't believe I did it.  I was so nervous but at that moment,
I was in the zone and just wanted it to be over as quick as possible.


After that, I went through all the same processing steps with guidance from the farmers who kept close, careful watch!  You can see how my boyfriend and I did in the following photos:
Phil's bird after the hot-soapy bath.
My bird after de-feathering
Phil removing the feet from his bird 
These guys were are great addition to my bone broth!
I could only imagine you get better and faster at this the more you practice 
Removing the organs... this was harder than it looked!
You could see the grass and supplemental feed that the chicken had eaten!
My completed bird!
Phil and his completed
Our birds and all the organs/heads and feet!  We will use every part of the bird!
No Waste here!

Final Review:
I was blown away at how emotional I was about the entire process.  I felt an amazing sense of accomplishment and closeness to the bird that I processed.  I felt overwhelmingly thankful for all that these farmers at Primal Pastures are doing.  I think that this processing workshop is so valuable and helped to bring me closer to my food.  I highly recommend this workshop for anyone in the area!  (or if you aren't in SoCal, make a special trip!) I hear all the time about these posh, Beverly Hills "Farm to Table" restaurants.... but they truly have nothing on this.

Dinner never tasted so good!  I have never eaten a chicken so fresh!
I felt so proud to be able to eat this for dinner that same night!  An experience I will never forget!


Sunday, December 21, 2014

Coconut Milk Yogurt with Strawberry-Balsamic Sauce - Instant Pot, Dairy-free, AIP

Hi! It's Tonja again…  and thanks to a bunch of people posting on Facebook (and Nom Nom Paleo praising the machine itself), I went and purchased an Instant Pot on Amazon during a 24-hour sale a couple of weeks ago. My main reasoning for purchasing was the idea of bone broth in less than 2 hours (and without stinking up my house for 2 day - maybe the bigger reason). But when I saw all the things this little machine could do, I was even more excited.

Namely, yogurt.

(Since then, Zenbelly informed me you can sous vide in the thing by using the "warm" setting - stay tuned because I am pretty sure she's going to be testing that one out!)

I've never been a huge yogurt fan, but the boyfriend is. So when I told him I was going to be attempting a yogurt recipe he was pretty excited.

And now that I've nailed it, I wanted to make sure to get it out to all of you who purchased the Instant Pot too. If you haven't, I get there are other ways to make yogurt with your oven, etc. But obviously this makes the process a lot easier, otherwise I would have tried those other recipes.

Also, DISCLAIMER: I've have only tried it with the exact ingredients I link to in the ingredients list. I'm aware there are a million types of probiotics and coconut creams out there, but if you use those, do so at your own risk. I have absolutely no experience with them with this recipe. Again, all products are linked in the ingredients list.

Coconut Milk Yogurt with Strawberry-Balsamic Sauce - #Instapot, #Dairyfree ~ flame to fork

Coconut Milk Yogurt
AIP * dairy-free

Hands-on time: 30 minutes
Cooking time: 12 hours

Makes 4 cups
* It's possible other probiotics will work just as well, but for comparison purposes, I used 50 billion CFUs. If you use another brand, just make sure it is stored in the refrigerator. This brand is highly recommended by my functional medicine doctor and I alternate in taking this as a supplement every night with my Prescript-Assist so my body doesn't form any sensitivities to either one. 

The basic instructions for making the yogurt are on page 16 of your 7-in-1 Instant Pot manual.

Make sure you will be available when the yogurt is finished, so approximately 13 hours from the time
Coconut Milk Yogurt with Strawberry-Balsamic Sauce - #Instapot, #Dairyfree ~ flame to fork
you start this recipe. Starting in the morning to finish at night is ideal.

Plug in your Instan Pot and pour the well-shaken carton of coconut milk into the metal reservoir. Close and seal the lid and hit "yogurt" and then the "adjust" button so the display now says "boil". I am not sure this step is necessary since we are using coconut milk from a sealed container, but the idea is to boil/scald the milk to kill any other bacteria that could inhibit  the growth of the good stuff we'll be putting in to sour the milk.

When the machine beeps to signal this step is completed, remove the lid and take out the metal reservoir and set it somewhere heat safe. This is the only step you need to pay attention to as you want the milk to cool to below 115 degrees. I used a meat thermometer for this :)

Once it has cooled, empty both the probiotic capsules into the milk and whisk to combine well. Return the metal reservoir back to the machine, close and seal the lid and hit the "yogurt" button again. This time you'll want to use the "+" button just below the display to set the time to 12 hours. It's possible it could be done anywhere from 8-12 hours, but my yogurt came out with a nice amount of tartness with 12 hours.

Coconut Milk Yogurt with Strawberry-Balsamic Sauce - #Instapot, #Dairyfree ~ flame to fork
When the machine beeps to signal the 12 hours is up, make sure to taste the coconut milk to ensure it is tart. In ONE trial run, it still just tasted like plain coconut milk. I had entrusted the boyfriend to put the probiotics in and I am still not sure what he did. He swears he used the right ones and put 2 capsules in - we will never know! If for some reason it didn't work, add a couple more capsules, whisk to combine and set the machine for another 12 hours. It's possible some capsules just might be bad.

If to your desired tartness, remove the metal reservoir from the machine, lightly sprinkle the gelatin over the top of the yogurt and whisk vigorously until the gelatin is well-combined and no visible lumps are seen. Pour into desired containers/bowls and let set in the fridge for several hours. I didn't keep track as to how long it took, but I do remember checking a few hours later and being worried it wouldn't thicken - it did :) Just be patient!

Optional:

  • Instead of serving with the sauce below, before refrigerating, add in your sweetener and flavors of choice: maple syrup, melted honey, coconut sugar, vanilla, etc. and make it your own! 

STRAWBERRY-BALSAMIC SAUCE
Refined-sugar free 

Makes 2 cups

  • 1 (16 oz.) bag of frozen strawberries
  • 1/4 cup water
  • 2 tablespoons balsamic vinegar
  • 1/4 cup (or to taste) raw organic honey (I used clover honey)
In a small saucepan over low heat, add in the strawberries and water and cook until melted down and very soft. Add in the balsamic vinegar and honey and continue to cook for about 15 minutes over medium. Either using an immersion blender or by pouring the contents into a blender, blend until smooth. Continue to cook over medium heat until thickened. Pour into a container and refrigerate until cool. 

Coconut Milk Yogurt with Strawberry-Balsamic Sauce - #Instapot, #Dairyfree ~ flame to fork

Some of the links in the post above are “affiliate links.” This means if you click on the link and purchase the item, we will receive an affiliate commission. Regardless, we only recommend products or services we use personally and believe will add value to our readers. This money helps us continue to be able to offer support and services to you, our readers. Plus, it helps us keep our freezers fully stocked with bacon :) We all need bacon. 

Tuesday, November 4, 2014

AIP Chewy "Chocolate" Chunk Cookies (grain-free, egg-free, nut-free, dairy-free)

This girl likes her cookies.

So when I found out that I would need to start following the autoimmune protocol (AIP) to help heal a leaky gut, my old-standby of Seriously Chewy Chocolate Chip Cookies were a no-go.

I can tell you, it is not easy to follow this protocol. Although these cookies are good, they were still created as a treat in a way of eating that seems so limiting. Something to help everyone feel a bit more "normal" while living in a world where they can't eat normal. In the real world of convenience foods (even the paleo/"clean" ones), restaurants and anything else created to help simplify real food for the majority of people, there are ingredients that someone on AIP cannot have. Paprika is in EVERYTHING. And even if it doesn't say paprika, for some reason "spices" and "natural flavors" are perfectly acceptable ingredients list items, which pretty much translates to me as "don't even bother."

So having been AIP just over a month now, I feel the need for normalcy. I'll be honest and say I've cried a few tears in my kitchen. I've sobbed while washing the thousandth dish that week since I am literally cooking every dang day. I know I am not alone.

And I just want a cookie.

(did you just picture me on the floor, pounding my fists on the ground, having a tantrum??)

Out of desperation, comes yumminess for you guys as well. I hope you like it!

xo -  Tonja


Chewy "Chocolate" Chunk Cookies
AIP * grain-free * egg-free * nut-free * dairy-free

Make 8 cookies
* arrowroot may be substituted, however I made them both ways and all testers agreed the tapioca was a better "mouth feel"
** if you tolerate chocolate, feel free to substitute Enjoy Life chocolate chips

Preheat oven to 350 degrees.

In a medium sized bowl, combine tapioca flour, coconut flour, gelatin, coconut sugar, salt and baking soda.

In a small bowl, melt the palm shortening and then stir in the maple syrup and vanilla.

Add the liquid mixture to the flour mixture and stir until well combined.

Mix in the homemade carob chips (or chocolate chips) and let cool (or pop in the refrigerator for 10 minutes).

Divide batter into 8 equal portions and roll each portion into a ball. Place the dough balls onto a parchment lined cookie sheet and flatten to about 3/4" tall.

Bake for 10 minutes or until edges are golden brown.

Let cool on the cookie sheet for about 5 minutes before putting on a cookie rack to cool completely (but I won't tell anyone if you just gobble them up right away).


Carob Chunks
cocoa-free * dairy-free

Make 2 cups


In a small saucepan over medium-low heat, melt the palm shortening and coconut butter. Add in the coconut sugar and stir until dissolved (most likely it will not dissolve completely, but hey, we can try). Remove from heat and stir in the carob powder, vanilla and sea salt.

Pour the mixture into a parchment-lined 8x8 baking dish or pan and put in the freezer for 20 minutes.

Remove from the freezer and using a sharp knife, cut the mixture into chocolate-chip sized chunks (the mixture should still be fairly soft and easy to run a knife through). Return to the freezer to completely harden.

Once ready to use for the first time, using the pre-cut lines, break the "chocolate" into separate chunks.

Store extra in an air-tight container in the freezer.

Some of the links in the post above are “affiliate links.” This means if you click on the link and purchase the item, I will receive an affiliate commission. Regardless, I only recommend products or services I use personally and believe will add value to my readers. This money helps me continue to be able to offer support and services to you, my readers. Plus, it helps us keep my freezer fully stocked with bacon :) We all need bacon. 

Friday, October 10, 2014

Salted Maca Mocha

So I never post to this blog.... I know that I am one of the worst bloggers out there, but thats ok! We all have our strengths and our weaknesses...  I try to get as much info out there as I can on Instagram and so many people ask me..."can I find that recipe on your blog?!?!"  I always say, "nah, I don't really blog"...but today...TODAY! I SHALL BLOG (or "post" for those of you bloggers that like to get particularly technical about the terminology)...just don't expect me to make a habit of this...I can't be held accountable for allowing months to pass before my next post....

Back to the post...

We don't really get to experience the seasons here in Southern California and I do miss those chunky sweaters, infinity scarves, fallen leaves and hot breakfast coffee drinks :)  I tend to always grab an iced coffee from the local coffee shop on my way to work if I need (or just "want" as it usually is) a mid-morning pick me up after my usual BPC (bulletproof coffee).


I have experimented with all sorts of concoctions in my Bulletproof Coffee from plain old grassed butter and coconut oil, to MCT oil, turmeric and cayenne pepper.  We see lots of awesome recipes out there for different variations and I wanted to share with you one of my favorite combos: SALTED MACA MOCHA.
Check out WellnessMama's blog (one of my FAVs) about the benefits of Maca...

I used to work for *bux for about 5 years as a Store Manager and I like to think that I have a pretty decent handle on this coffee making thing.  So if you're so inclined, give this recipe a go and let me know how you like it!

You will need:


  • 10oz French Pressed Coffee (or just whatever coffee you have, however your favorite brew method is:) I use all different brands, but this morning I used Caveman Coffee Co. White Gold. (I am not an affiliate, I just happened to try and like their product two weekends ago at the Taste of Paleo event. :)
  • 1 tablespoon MCT Oil (again, I am using Caveman Coffee Co. MCT oil this morning and its Awesome!!)
  • 1 tablespoon Organic, Grass-fed Ghee (I love Tinstar Foods Ghee, its my favorite!  But if you like it a little frothier and can handle it, go ahead and use grass-fed butter like Kerrygold.)
  • 1 teaspoon Raw Maca Powder
  • 1 teaspoon Cacao Powder 
  • 1 teaspoon Organic Vanilla Extract 
  • sprinkle of salt

*OPTIONAL - dash of maple syrup (if you like your drinks on the slightly sweeter side)

Add all the ingredients together (except for the salt) and blend until frothy!  I blend mine up in my Nutribullet for about 15 seconds.  Pour in a mug and top the froth with a dash of sea salt.  Since you got it nice and frothy, it stays at the top and as you sip, you get that nice subtle, salty flavor mixed with the chocolate. :)

I should mention if you are new to bulletproof coffee, start with 1tsp each of MCT oil and ghee...your body may react negatively to the large amount of fat until you are more fat adapted. <3

What a great fall pick-me-up!  I hope you enjoy as much as I do!
xo-Clare

Some of the links in the post above are “affiliate links.” This means if you click on the link and purchase the item, we will receive an affiliate commission. Regardless, we only recommend products or services we use personally and believe will add value to our readers. This money helps us continue to be able to offer support and services to you, our readers. Plus, it helps us keep our freezers fully stocked with bacon :) We all need bacon. 

Sunday, July 13, 2014

Cold Asian Sweet Potato Noodle Salad (gluten-free, vegan, 21DSD)

Flashback to Paleo f(x) 2014 and the tons of yummy new foods that I tried.. one of which was a cold noodle salad that I think the Oh Kimchi Austin booth was selling. After my millionth sweet treat tasting (all good.. but sugar overload!), I was so thankful to have something that wasn't sweet. I found out the salad was made with sweet potato noodles and included their kimchi... I knew I had to find this once I was back home.

Then I got home and life happened and, well, I forgot about it.

Until Amazon recommended sweet potato noodles to me. I don't know how many of you out there have Amazon Prime, but it is DANGEROUS. Especially when you start eating all these off-the-wall foods that sometimes aren't available to you locally. Place a simple order and BAM! Sometimes it's to you the next day. I'll slowly start adding stuff to my cart - kind of like a shopping list - and then hit the purchase button once I have a few items. VERY dangerous.

Anyway, I ordered the noodles and they've been sitting on my counter for a few weeks. Then I made the Paleo by Season brined pork chops and thought "how perfect would these pork chops be on that noodle salad?!"

Now, I had no idea what I was doing with this recipe and every Google search came up with some 'japchae' recipes - so I kind of went from there, but also kept it simple and CLEAN. No sugar, no weird chili pastes with bad oils - just stuff MOST of us have in our cupboards.

This is perfect for dinner on a hot summer night and because of the sweet potato starch (and with the addition of a protein), this works awesome as a post-workout meal!

So order some of those noodles (I got this brand) and get to making this!

Cold Asian Sweet Potato Noodle Salad
grain-free * gluten-free * vegan * 21DSD
Serves 6-8

  • 10 oz. sweet potato noodles (half of the 1lb 4oz package)**
  • 2" piece of ginger, finely minced
  • 3 garlic cloves, finely minced
  • 2 Tbsp toasted sesame oil
  • 1/4 cup coconut aminos
  • 2 Tbsp rice wine vinegar
  • 3 cups purple cabbage, very finely sliced (about 1/2 very small cabbage
  • 1 large jalapeno, cut in half, seeded and finely sliced
  • 1 large carrot, peeled & julienned
  • 1 small red bell pepper, quartered and sliced thin
  • 2 green onions, finely sliced
  • 1 cup of your favorite kimchi
  • 1 cup cilantro, chopped
  • optional: sesame seeds
  • optional: leftover pork, chicken, steak, etc., thinly sliced

Cook the sweet potato noodles according to package directions and rinse with cold water. Keep the noodles in the cold water until you're ready to mix in the other ingredients.

While the noodles are cooking, mix together the ginger, garlic, sesame oil, coconut aminos and rice wine vinegar in a small bowl. Set aside.

Combine the cabbage, jalapeno, carrot, bell pepper, and green onions in a large bowl. Pour about 1/4th of the coconut aminos sauce over the veggies and mix well. Drain the noodles well and add to the bowl with the veggies and pour about half of the remaining coconut aminos sauce over the noodles and mix the entire contents of the bowl together. Add in the kimchi and cilantro and mix until well combined. Taste and if needed add the rest of the coconut aminos sauce.

At this point you may refrigerate and let chill further - this will help the flavors incorporate better - but it will taste great right away as well.

When you're ready to serve, top with sesame seeds and meat of your choice.

** For a lower carb option, try substituting kelp noodles!


Some of the links in the post above are “affiliate links.” This means if you click on the link and purchase the item, we will receive an affiliate commission. Regardless, we only recommend products or services we use personally and believe will add value to our readers. This money helps us continue to be able to offer support and services to you, our readers. Plus, it helps us keep our freezers fully stocked with bacon :) We all need bacon. 

Thursday, July 10, 2014

Are you addicted to sugar & carbs?

Are you one of those people who HAS to have something sweet after a meal?

Or do you reach for the M&Ms, sugar-filled coffees or other
carb-filled treats in your normal afternoon slump?

How about those "hangries"? That feeling that you might rip
someone's head off if you don't eat every 2-3 hours?


Are we speaking your language? I (Tonja) have been there - most of my life actually. Most mornings I ate breakfast, packed two snacks and a lunch and then had dinner and another snack after dinner. If I didn't consume something every 2-3 hours my stomach would scream at me and people knew to stay away. 

Plus, sugar and carbs had such a pull on me.. physically. I still talk about how doughnuts talk to me... but their pull on me is definitely less than it use to be and I've learned just how real food can heal so many areas of your life - not just the physical. 

How? I've done multiple 21-Day Sugar Detox's - every few months or so I re-set my carb-monster and feel AMAZING. I lose a ton of bloat, sleep better, my adult-onset acne clears up, my mood improves and I can go awhile without eating, which is great when life throws you curveballs and you can't always have food with you. 

But beyond the program books, recipes, meal plans (which are just ideas), this isn't a program where you have to buy shakes, pills, special cleansing drinks, etc.You only really need to buy your food.. because...

THIS IS A REAL FOOD DETOX. 

Now, even if you've done this detox before and have the old e-book or the current book/cookbook, the online program is COMING BACK.  This will offer Diane Sanfilippo the ability to continually update the program for you, offer support not offered to the general public in forums, and give you tons of freebies you can't get otherwise. If you don't have the books, you'll get the opportunity to purchase them and have them shipped to you for FREE. 

The program hasn't launched yet.. you can purchase it on July 24th... but RIGHT NOW you want to click on the graphic below (or here) and sign up to get FREE emails with no obligation to purchase anything:


Once you sign-up, you'll get a series of FREE emails from Diane on these topics (sent out on separate days prior to the launch):
  • Why we crave sugar
  • Three places sugar hides in every day foods
  • Three super foods that help you detox naturally from sugar 
  • How to find food freedom once and for all
You'll then also get the email to remind you when it's available for purchase on July 24th.

So sign-up for the free videos.. think about it...email us if you have any questions. We're here to help! We want you to be successful in kicking sugar and carbs to the curb. It's a tough battle.. one of the strongest addictions known to man, and we are in this with you!

Some of the links in the post above are “affiliate links.” This means if you click on the link and purchase the item, we will receive an affiliate commission. Regardless, we only recommend products or services I use personally and believe will add value to my readers. This money helps us continue to be able to offer support and services to you, our readers. Plus, it helps us keep our freezers fully stocked with bacon :) We all need bacon. 

Sea Salt Caramel Macaroons (gluten-free, grain-free)

I sense a detox coming up soon for myself (Tonja!) .. might have to make these ASAP! I originally published these on my old blog and am slowly working on transitioning some recipes over here. Can you tell I love sweets? These take a little effort, but the leftover caramel will be worth it :)

Sea Salt Caramel Macaroons
grain-free * gluten-free 
Makes 10

For the caramel

  • 1 cup blonde coconut/palm sugar
  • 1/4 cup water
  • 6 tbsp pastured butter, cut into chunks
  • 1/2 cup canned, full fat coconut milk
  • 1 1/2 tsp sea salt


Combine the coconut sugar and water in a small saucepan over medium-high heat, whisk to combine.
Continue to cook, whisking regularly, for about 4-5 minutes. Add the butter and continue to whisk. You should begin to notice the mixture thickening and producing large bubbles. This is the part where you just need to eyeball its doneness (I didn't bother with a candy thermometer). Once it seems to have thickened up quite a bit, add the coconut milk and sea salt and continue to whisk for several minutes. Once you feel it has thickened to melted honey consistency, remove from the heat. Don't worry, if it doesn't seem to thicken up to the consistency of honey at room temperature, you can put it back over the heat and cook for several more minutes. This part just takes patience - but the reward is TOTALLY worth it!

For the macaroons


Preheat your oven to 190 degrees (according to The Urban Poser you are more drying out the macaroons than cooking them - this recipe of hers inspired me to make these!).

Combine the almond flour and coconut in a medium bowl. In a separate bowl, combine the slightly cooled caramel, coconut oil and vanilla. Once combined, add to the almond flour/coconut bowl and mix well. This part is easier done by hand to make sure everything is fully incorporated. Use a small cookie scoop (about 1 tbsp size) to firmly pack in the mixture and then release onto a cookie sheet lined with a Silpat or parchment paper.

Cook for approximately 50-60 minutes, but keep an eye on them to make sure they aren't browning (lower the heat slightly if they are). Once done, remove from the oven and let cool. Optional: melt unsweetened chocolate (the macaroons are sweet enough!) and dip the bottoms into it - use the extra caramel to drizzle on top!

Some of the links in the post above are “affiliate links.” This means if you click on the link and purchase the item, we will receive an affiliate commission. Regardless, we only recommend products or services we use personally and believe will add value to our readers. This money helps us continue to be able to offer support and services to you, our readers. Plus, it helps us keep our freezers fully stocked with bacon :) We all need bacon. 

Monday, June 23, 2014

Seriously CHEWY Chocolate Chip Cookies (grain-free, egg-free, vegan)

Ok, don't hate us. I was looking back at our last few recipe posts and they have all been SWEETS. But you know what? Those are the recipes we're constantly asked about on Instagram every time we make them. We put them here so you can find them easily -- so don't blame us! :)

This recipe really isn't a new recipe, but more like an adaption of a Balanced Bites' recipe which only requires omitting ingredients. We've referenced it so many times on Instagram that Clare finally said "You should just write a blog post so we can just send them there, rather than tell them where to find it and which ingredients to remove."

Ok, done.

Grain-free egg-free Chocolate Chip Cookie!
All wrapped up and ready to go!

So here you go. These cookies seriously ARE the best grain-free chocolate chip cookies out there. Not only am I allowed to say it because *I* believe it… but Clare was skeptical until I told her to make them. She had an old favorite…. these have now won her over.

Chewy Chocolate Chip Cookies
grain-free ~ gluten-free ~ egg-free ~ paleo
(adapted from this recipe by Balanced Bites)

Preheat oven to 350 degrees. 

In a small bowl, combine the butter, maple syrup and vanilla and set aside. 

In a food processor or large bowl, combine the almond flour, gelatin, baking soda and salt. If using a food processor, blend for 30-60 seconds until the mixture starts sticking together slightly.  Blend or mix in the butter mixture. Fold in the chocolate chips. At this point I highly suggest to refrigerate the dough until it is completely cooled. Depending on the fat used, the batter may stay really "greasy", but it's ok, the cookies don't come out greasy :) The refrigeration should help any spreading issues some of you have had in the past. 

Place the dough by rounded spoonfuls on a parchment-lined cookie sheet and flatten slightly. Bake for 12-13 minutes or until edges are just golden brown.

Let cool for about 10 minutes on the cookie sheet before removing or they may fall apart (but still taste amazing!). 

And here is a variation I did with my 8" cast-iron skillet! A PIZOOKIE! Cook in the oven until the top turns golden brown - no idea on the cook time - sorry! :)
Grain-free egg-free Chocolate Chip Pizookie!
Some of the links in the post above are “affiliate links.” This means if you click on the link and purchase the item, I will receive an affiliate commission. Regardless, I only recommend products or services I use personally and believe will add value to my readers. This money helps me continue to be able to offer support and services to you, my readers. Plus, it helps us keep my freezer fully stocked with bacon :) We all need bacon.